~InfoDump

IT jargon, musings, and life in general…
  • Home
  • About Me
  • Build Specs
  • Contact Me
Twitter RSS
Home » Page 2

Categories

  • Applications
  • General
  • IT
  • Linux
  • Scripting
  • Windows

Recent Posts

  • Weekend of Virus Removal!
  • Configuring SNMP on Windows Hosts
  • Nagios v3 & Centreon v2 Guide
  • MS SQL Server Express 2008 Remote Connections
  • BareTail for Windows

Archives

  • December 2012
  • September 2012
  • August 2012

Latest Tweets

johndwhite0388johndwhite0388

  • johndwhite0388Kind of scary that I can pull out notes for a colleague on DB Normalization from my degree in under a minute while at work #tooorganized - posted on 10/05/2013 14:41:24

  • johndwhite0388I just unlocked the Acquire Kittehs! badge on @codecademy! http://t.co/a2m3H97Ifx via @codecademy - posted on 26/04/2013 11:17:27

  • johndwhite0388I just unlocked the How to use APIs with Python badge on @codecademy! http://t.co/a2m3H97Ifx via @codecademy - posted on 26/04/2013 10:47:10

  • johndwhite0388I just unlocked the File Input/Output badge on @codecademy! http://t.co/a2m3H97Ifx via @codecademy - posted on 25/04/2013 17:27:25

Sep10

IMG Files & VirtualBox

by John on September 10, 2012 at 5:27 PM
Posted In: Applications, IT

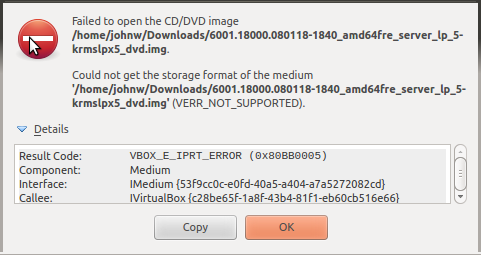
While working on a test environment at work, I downloaded an IMG file from Microsoft to install a couple language packs on a server I was configuring. For most of my testing I use VirtualBox on my local workstation, so I figured I would just load the IMG file into the VM’s virtual CD/DVD drive and carry on. Unfortunately, VirtualBox cannot seem to make use of this format:

image

Now, before you get carried away with file-type conversion software, and using the virtualbox cli tools to turn the file into a virtual disk (solutions I came across), try simply renaming the extension. Manually removing “.img” and saving the file as “.iso” was all it took, and VirtualBox happily loaded the file into the virtual CD/DVD drive.

Now you know!

└ Tags: conversion, File, format, image, img, iso, tips, VirtualBox
 Comment 
Sep07

Uninstalling Symantec AV Without Install Password

by John on September 7, 2012 at 12:22 PM
Posted In: Applications, IT, Windows

Once in a while you may run into a password protected installation of Symantec AV. (Who knows who put it there, but they probably aren’t around anyone, you don’t have the password, and if it was you then we will still pretend it was the other guy!)

All is not lost! You can get around the password prompt when you attempt to uninstall the product by changing the follow registry key:

  • HKEY_LOCAL_MACHINE\SOFTWARE\INTEL\LANDesk\VirusProtect6\CurrentVersion\Administrator Only\Security
    • Change the value from 1 (True) to 0 (False)

Voila. You can now uninstall the product and send nasty emails to the previous tech for not documenting his work!

└ Tags: AV, hack, IT, registry, Security, Symantec, Windows, workaround
 Comment 
Sep07

Rebuilding the Windows Boot Environment (Vista+)

by John on September 7, 2012 at 7:21 AM
Posted In: IT, Windows

Occasionally, whether by malware, a failing hard drive, or careless mistake, the boot environment for Windows becomes damaged and the operating system will no longer come to life. If due to the first or last reason, there is a pretty good chance the damage can be repaired. In the case of a failing drive, you might have some luck, but be prepared for potential data loss (or at least an un-bootable drive you will have to recover data from another way).

To completely rebuild and repair the boot environment:

  1. Obtain installation media for the OS you are running (Windows Vista, 7, and up)
  2. Boot the computer from the CD/DVD drive containing the installation media
  3. Follow the installation prompts until you get a “Repair your computer” option; select that
  4. Select the operating system install you want to repair
  5. Open a command prompt from the “System Recovery Options”
  6. Run the following commands:
    • bootrec /fixMBR
    • bootrec /fixBoot
    • bootrec /rebuildBCD
  7. Allow the commands to complete, reboot, and hope for the best!

For more information on the bootrec tool, check out this Microsoft KB article.

└ Tags: data loss, fix, guide, hard drive, IT, OS, repair, tips, Windows
 Comment 
Sep06

Installing Windows 2008 R2 on an HP DL360 G4p

by John on September 6, 2012 at 8:55 PM
Posted In: IT, Windows

One of my clients at my last job had a surplus of older HP servers that they acquired during a buyout of another company, and wanted to use them for test servers. They did have a production Hyper-V environment, but the current hardware didn’t have the resources to be used for a test environment. So, instead of letting literally floor-to-ceiling stacks of decommissioned G2-G4 HP servers go to waste, a spare rack was set up to accommodate a physical test environment. Unfortunately, 2008 R2 doesn’t seem to be supported (according to HP) on just about anything until the G5 series. As a 2008 R2 roll-out was in the works, this looked like the end of those servers’ useful lives.

Never Say Never!

The unsupported stance didn’t sit well with me, and while I understand from a production standpoint that it might not be a good idea to install unsupported software on unsupported hardware Wink, from a testing perspective I wasn’t concerned with 110% compatibility. So, I came up with a workaround that allowed me to get 2008 R2 up and running on the DL360 G4p:

  1. First and foremost, chances are most DL360 G4/G4p’s will have a CD rather than a DVD drive installed by default. This was the case for me. Just eject the entire drive using the release pin like you would any laptop drive and throw in a DVD drive instead. (Fully supported, just might not be common to have one already installed)
  2. Second, obtain the most up to date system ROM/BIOS and run the flash utility.
  3. Reset all system settings to factory defaults.
  4. Blow away and recreate any RAID configurations from scratch.
  5. Next, grab the SmartStart version 8.5 deployment tool from HP.
  6. Burn SmartStart to DVD and boot from the media.
  7. Now, follow the prompts until you get dropped to a command prompt, and then do the following:
    • We need to start the window manager “X” by running the following init scripts:
      • S52X
      • S54icewm
      • S56mouse
      • S58firefox
      • S60boot.health
    • You can start them all manually, or you can just run the following command:
      # sed -i.original ‘/Depth/s/24/16/g’ /etc/X11/xorg.default-us
      # for n in 52 54 56 58 60 ; do /etc/init.d/boot.d/S${n}* start ; done
  8. From here, the rest of the install is straight-forward and no different than any other SmartStart install. The only caution, which I ran into, is that when SmartStart asks for an Administrator password, make sure to give it a strong password that satisfies complexity requirements. The first time I installed the operating system I was unable to login with the admittedly simple password I had given it, but reinstalling and providing a complex password seemed to do the trick. Maybe it was just me, but there it is just in case!

If my memory serves, once 2008 R2 was installed, the server was only missing one device driver but I do not remember which – in any case it was not a system critical one. I created a number of test machines using this process which eventually were P2V’d into production. Never once ran into any hardware issues.

Obviously, it goes without saying this is an unsupported configuration and HP will (and they did to me) say it cannot even be done, and therefore will not offer support of any kind. The fact that it is officially unsupported will hopefully deter you from deploying them as production as well – just because it “works” doesn’t mean it will be 100% reliable with everything you throw at it.

Anyway, hope it helps someone!
└ Tags: 2008 R2, DL360, G4, G4p, guide, hack, hardware, HP, IT, server, testing, tips, Windows, workaround
1 Comment
Sep06

Useful Remote CMD Commands (DCOM, RPC, Firewall)

by John on September 6, 2012 at 8:05 PM
Posted In: IT, Scripting, Windows

The following commands are useful when troubleshooting remote workstations that are not responding properly to internal asset management suites or remote support viewing software. In my case it was ManageEngine’s ServiceDesk Plus suite and DameWare’s remote administration software, but many of these products could be affected by the same issues client-side.

Start the RPC service:

net start rpcss

Disable Windows Firewall:

netsh firewall set opmode disable

Enable DCOM via registry:

reg add HKLM\SOFTWARE\Microsoft\Ole /v EnableDCOM /t REG_SZ /d “Y” /f
reg add HKLM\SOFTWARE\Microsoft\Ole /v LegacyAuthenticationLevel /t REG_DWORD /d “2” /f
reg add HKLM\SOFTWARE\Microsoft\Ole /v LegacyImpersonationLevel /t REG_DWORD /d “3” /f

└ Tags: cmd, DCOM, firewall, IT, registry, RPC, scripts, tips, Windows, workaround
 Comment 
  • Page 2 of 3
  • «
  • 1
  • 2
  • 3
  • »

Calendar

May 2025
M T W T F S S
 1234
567891011
12131415161718
19202122232425
262728293031  
« Dec    

Tags

2003 2008 R2 ACL AV Centreon conversion data loss deployment File firewall fix format guide hack hard drive image img iso IT life Linux logs malware monitoring MSSQL Nagios Network OS registry repair Security server services SNMP SQL Symantec tail tips tools unattend VirtualBox virus weekend Windows workaround

Links

  • AARCS
  • johndwhite.net
  • Project Mayhem Forums
  • RyanJ

PROMO CODE:
DRMHOST123
Green Web Hosting! This site hosted by DreamHost.

©2012-2022 John White | Powered by WordPress with Easel | Subscribe: RSS | Back to Top ↑