~InfoDump

IT jargon, musings, and life in general…
  • Home
  • About Me
  • Build Specs
  • Contact Me
Twitter RSS

Categories

  • Applications
  • General
  • IT
  • Linux
  • Scripting
  • Windows

Recent Posts

  • Weekend of Virus Removal!
  • Configuring SNMP on Windows Hosts
  • Nagios v3 & Centreon v2 Guide
  • MS SQL Server Express 2008 Remote Connections
  • BareTail for Windows

Archives

  • December 2012
  • September 2012
  • August 2012

Latest Tweets

johndwhite0388johndwhite0388

  • johndwhite0388Kind of scary that I can pull out notes for a colleague on DB Normalization from my degree in under a minute while at work #tooorganized - posted on 10/05/2013 14:41:24

  • johndwhite0388I just unlocked the Acquire Kittehs! badge on @codecademy! http://t.co/a2m3H97Ifx via @codecademy - posted on 26/04/2013 11:17:27

  • johndwhite0388I just unlocked the How to use APIs with Python badge on @codecademy! http://t.co/a2m3H97Ifx via @codecademy - posted on 26/04/2013 10:47:10

  • johndwhite0388I just unlocked the File Input/Output badge on @codecademy! http://t.co/a2m3H97Ifx via @codecademy - posted on 25/04/2013 17:27:25

Dec17

Weekend of Virus Removal!

by John on December 17, 2012 at 6:00 AM
Posted In: Applications, IT, Windows

I don’t deal with “user”-type issues at my current job, so my exposure to these sorts of things has been drastically reduced to the occasional friend or family member. This past weekend was one such experience, and an experience it was! I had to deal with a particularly nasty bunch of viruses/rootkits/malware, and while I’m no stranger to the routine removal of such things, I actually had to look up some new tools to help me out with this one. I’ll go through my newly expanded list of utilities below, in the order of use.

The Operating System!

First and foremost, before you start downloading and installing the first 10 hits on google for whatever problem you are having, make use of the tools already at your disposal. While you may not be able to solve all your problems without additional tools, at least taking a look around the OS will give you some hints on where to focus your efforts. Here is a list of things I usually do before doing anything else:

  • Check currently running services and processes using Task Manager
    • More often than not, the problem you are diagnosing is a “slow” computer. Check how much memory/CPU is being used and by what to see if the answer is already right in front of you. The culprit may be an unfamiliar process that is most likely malware, but it could just as easily be a malfunctioning legitimate process. It could also be death by a thousand paper cuts – meaning you have way too many things running at once, perhaps due to necessary startup programs.
  • Check Windows Event Logs
    • This seems like common sense, but no one seems to start here. The logs are useful, and should almost always give you some kind of idea what the problem is, or at least what part of the system is being affected.
  • Update your system
    • Now, this step isn’t very likely to fix anything, but it will certainly help keep problems at bay in the future. An up to date system is much less likely to become infected or suffer from performance bugs. It may even reveal problems or infections by virtue of NOT running properly for you (ie. Windows Update errors).
  • msconfig
    • msconfig is a program that is available on any Windows OS, and can be used to modify startup services, programs, and scripts, specify special boot parameters, and launch some system tools. For example, instead of fighting with your BIOS and bootloader trying to get into the Windows boot selection screen manually by pressing F8 at just the right time, you can just tell Windows to use safe boot next time you restart. Some of you might prefer using 3rd party tools to control most of the behaviour in msconfig (I do as well), but knowing how to use this tool will mean you can make these changes even in cases you do not have access to your favourite utility.

TDSSKiller

This is a new one for me as of my adventure this weekend. Normally, once taking a quick look at the system, I am able to clear up most of the issues and then take care of any malware via MalwareBytes and AV. In this case, the infection was keeping me from being able to run these even in safe mode. TDSSKiller is a utility from Kapersky designed to remove rootkits. Simply run the executable, and let it do its thing. It will automatically remove any results, and with any luck return control of your system to you. I ran this in safe mode, and then in regular Windows.

Combofix

Another new one to me. Unfortunately in my case, TDSSKiller removed only part of the infection – I was still unable to run my usual anti-malware tools. Combofix is also an executable, which scans for known malware and attempts to clean anything it finds. Once finished, it also produces a very informative log that tells you what was scanned, what was found, and how it was dealt with. This tool removed the remaining infections that were keeping me from launching certain applications.

Malwarebytes

This is usually the bread and butter of my computer clean up tools. It seems to find infections that no other software does for me, and removes it with ease. Once TDSSKiller and Combofix removed the more vile of infections, I was able to run Malwarebytes and clean up the remaining offenders.

Microsoft Security Essentials (MSE)

It always seems a bit funny to me that I recommend a Microsoft product for PC security/AV over all others, but my own experiences as well as others documented on the web have shown MSE to superior to most (and sometimes all, depending on the tests) other free AV. Add in that definition updates come down integrated through Windows Updates, it is a free product (no trials), and designed by the guys in Redmond for their very own operating systems, and you get a pretty awesome AV client. And only seeking to prove itself further with me, after all of the above tools (MWB included), Security Essentials actually found and cleaned up a couple additional infected files after completing a full scan.

Clean up

So after all was said and done, and this laptop from hell was behaving again, I had one last issue that I was pretty much expecting to find from the beginning. An earlier attempt to install the most recent Windows Updates tipped me off, but I figured I would wait until everything was clean to try again, and sure enough a number of critical security updates refused to install. Turns out one of the plethora of unsavoury pieces of software I had just removed, had also had its way with the Update service in an attempt to keep some vulnerabilities open.

The errors I was receiving was Windows Update Error 800B0100, which according to Microsoft means that a file needed by the update service is either corrupted or missing. First things first, I attempted to use the System Update Readiness Tool from Microsoft to attempt to install the update manually. This worked for one of missing updates, but not the other. After a bit of digging through Microsoft’s self service sites, I came across an automatic troubleshooter here. This tool took about 10 minutes to repair Windows Update components, re-register some security DLLs, and correct a database issue. After this, Windows Update completed without complaint.

Next step: teach the in-law responsible not to install more spyware!

Links

TDSSKiller – http://support.kaspersky.com/5350

ComboFix – http://www.combofix.org/

Malwarebytes – http://www.malwarebytes.org/

Microsoft Security Essentials – http://windows.microsoft.com/en-US/windows/security-essentials-download

System Update Readiness Tool – http://support.microsoft.com/kb/947821

Windows Update Error 800B0100 – Automatic troubleshooter

└ Tags: guide, IT, malware, Security, tips, virus, weekend, Windows
 Comment 
Dec16

Configuring SNMP on Windows Hosts

by John on December 16, 2012 at 2:09 PM
Posted In: IT, Windows

The SNMP service is not enabled by default in Windows, so it must be manually added. The following sections will explain how to do this in both Windows Server 2003, and in Windows Server 2008 R2. These methods should be adaptable to the corresponding desktop operating systems as well (XP, Vista, 7).
 

Installing the SNMP service in Windows Server 2003

  1. Go to:
    • Control Panel > Add/Remove Programs > Add/Remove Windows Components
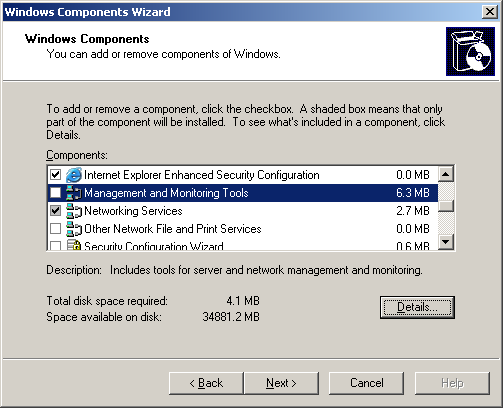
  2. Scroll down, and highlight Management and Monitoring Tools:
    snmp_2003_1
  3. Click the Details button
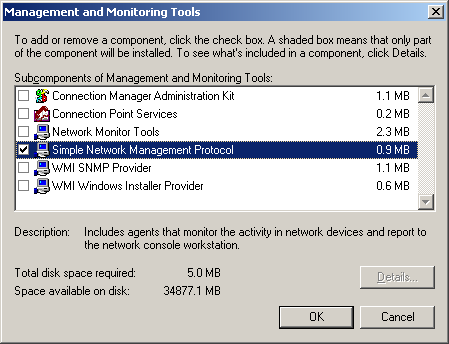
  4. Scroll down, and select Simple Network Management Protocol:
    snmp_2003_2
  5. Click OK, and follow the prompts
    • Note: For Server 2003, you will need the installation media for the server to install this feature.


Installing the SNMP service in Windows Server 2008 R2

The process is more streamlined in 2008 R2, and you do not require installation media to add the feature.

  1. Go to:
    • Server Manager > Features > Add Features
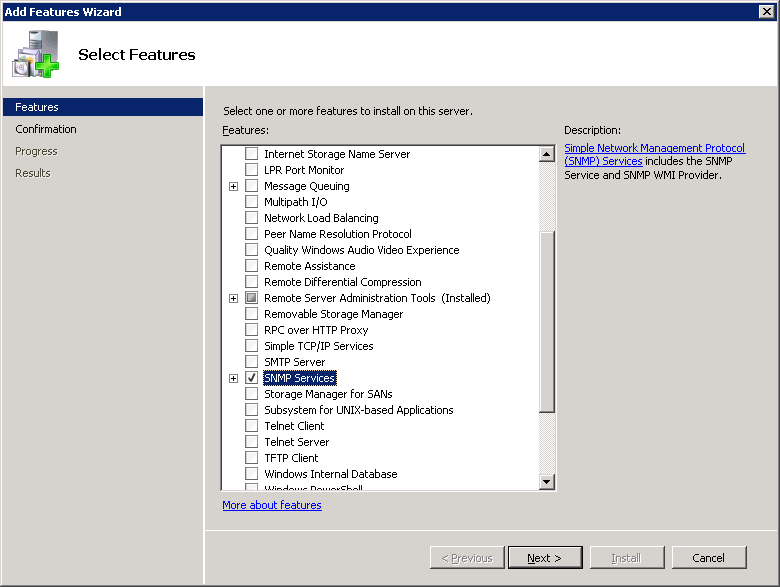
  2. Scroll down, and select SNMP Services:
    snmp_2008_1
  3. Click Next, and follow the prompts to install


SNMP Service Properties

Now that the service is installed, it must be configured to allow your network monitoring system to access SNMP data.

  1. Go to:
    • Services > SNMP Service > Properties
  2. First, configure the Traps tab:
    1. Enter the community name, and click Add to list
    2. Under “trap destinations”, click Add
    3. Type the FQDN of the network monitoring system
    4. Click Add
  3. Now, configure the Security tab:
    1. Under “Accepted community names”, click Add
    2. Enter the community name, and make sure READ ONLY is selected
    3. Click Add
    4. Under “Accept SNMP packets from these hosts”, click Add
    5. Type the FQDN of the network monitoring system
    6. Click Add
  4. Restart the SNMP service to make sure all the changes are recognized


└ Tags: 2003, 2008 R2, guide, IT, monitoring, Nagios, server, SNMP, Windows
 Comment 
Dec14

Nagios v3 & Centreon v2 Guide

by John on December 14, 2012 at 7:16 PM
Posted In: Applications, IT, Linux

Intro

Nagios is an incredible tool for monitoring your IT infrastructure. It offers monitoring and alerting for servers, switches, routers, firewalls, applications, services, and can be configured for just about any networkable device using SNMP. As powerful as it already is, a multitude of third party and official plugins, and client-side agents can be configured to increase efficiency and extend functionality. One of the biggest complaints I hear about Nagios is the complexity involved in configuring it. One of my challenges while I was deploying a Nagios monitoring system to a client was that the implementation needed to be maintained and expanded upon with relatively little Linux knowledge or in-depth understanding of Nagios itself, after I was gone.

The solution I came up with for this particular client was Centreon. Centreon is actually a full featured monitoring solution in itself, but uses Nagios as a back-end. This means that while configuration and monitoring is done from within the Centreon web UI, there is still a fully functional instance of Nagios running in the background that does all of the work you would expect. In this way, Centreon can be thought of as a very full-featured front-end interface, although it brings together a few other tools and custom functionality above and beyond a typical Nagios installation.

Anyway, in this post, I will detail the steps involved in getting Nagios & Centreon set up for monitoring your network. This guide is based on CentOS 5, but can easily be adapted to any Linux distribution.


Prerequisites

  1. By default, CentOs does not include all of the packages needed in the default yum repositories, so an additional repository must be added (RPM Forge):
    mkdir /usr/local/src
    cd /usr/local/src
    wget http://packages.sw.be/rpmforge-release/rpmforge-0.5.1-1.e15.rf.i386.rpm
    wget http://dag.wieers.com/rpm/packages/RPM-GPG-KEY.dag.txt

    Edit RPM-GPG-KEY.dag.txt so the first line is "-----BEGIN PGP PUBLIC KEY BLOCK-----"

    rpm -import RPM-GPG-KEY.dag.txt
    rpm -Uvh rpmforge-release-0.5.1-1.e15.rf.i386.rpm

    Keep in mind, the version number reflects the version available when I did this. It will change over time, so you will have to find the available version if this doesn’t work for you.

  2. Now we should be ready to update the system and install our prerequisite packages using yum:
     yum update
     yum upgrade
     yum install httpd
     usermod –U apache
     yum install gd fontconfig-devel libjpeg-devel libpng-devel gd-devel perl-GD
     yum install openssl-devel perl-DBD-MySQL mysql-server mysql-devel
     yum install php php-mysql php-gd
     yum install php-ldap php-xml php-mbstring
     yum install perl-DBI perl-DBD-MySQL
     yum install perl-Config-IniFiles
     yum install rrdtool perl-rrdtool
     yum install perl-Crypt-DES perl-Digest-SHA1 perl-Digest-HMAC net-snmp-utils
     yum install perl-Socket6 perl-IO-Socket-INET6 net-snmp net-snmp-libs php-snmp
     dmidecode lm_sensors perl-Net-SNMP net-snmp-perl
     yum install fping cpp gcc gcc-c++ libstdc++ glib2-devel
     yum install php-pear
     pear channel-update pear.php.net
     pear upgrade-all


Installing Nagios

  1. Before installing Nagios, a user needs to be created and configured:
    usradd -m nagios
    usermod -L nagios
  2. A group for use of external commands also needs to be created:
    groupadd nagcmd
    usermod -G nagios,nagcmd nagios
  3. Add the apache user to the nagios and nagcmd groups:
    usermod -G nagios,nagcmd apache
  4. The latest version of Nagios can be found at: http://www.nagios.org/download/ (Again, the version number may have changed since I wrote this). In this case I am downloading Nagios from sourceforge, extracting it, and configuring it with the users/groups above and some additional options:
    cd /usr/local/src
    wget http://prdownloads.sourceforge.net/sourceforge/nagios/nagios-3.2.3.tar.gz
    tar –xzf nagios-3.2.3.tar.gz
    cd nagios-3.2.3
    ./configure –-prefix=/usr/local/nagios –-with-command-group=nagcmd –-enablenanosleep –-enable-event-broker
    make all
    make install
    make install-init
    make install-commandmode
    make install-config


Installing Nagios Plugins

The latest version of Nagios plugins can be found at: http://www.nagios.org/download/

  1. Make sure the plugin prerequisites are installed:
    yum install fping
    yum install openssl-devel
    yum install openldap-devel
    yum install postgresql-devel
    yum install radiusclient-ng-devel
    yum install samba-client libsmbclient
  2. Download and install the plugins:
    cd /usr/local/src
    wget http://ovh.dl.sourceforge.net/sourceforge/nagiosplug/nagios-plugins-1.4.15.tar.gz
    tar –xzf nagios-plugins-1.4.15.tar.gz
    cd nagios-plugins-1.4.15
    ./configure –-with-nagios-user=nagios –-with-nagios-group=nagios –-withopenssl=/usr/bin/openssl –-enable-perl-module
    make
    make install


Installing NDOUtils

NDOUtils is essentially a tool that allows Nagios to interact with a database, rather than use direct input/output. It is required because Centreon is database driven in that all of the configuration, history, and events are stored in a database.

  1. First, make sure the MySQL development package is installed:
    yum install mysql-devel
  2. Now we can install NDOUtils. There are are multiple versions if NDOUtils available, but the one that should be used here is the official version, accompanied by a patch from Centreon:
    cd /usr/local/src
    wget http://prdownloads.sourceforge.net/sourceforge/nagios/ndoutils-1.4b9.tar.gz
    tar –xzf ndoutils-1.4b9.tar.gz
    cd ndoutils-1.4b9
    wget http://svn.centreon.com/trunk/ndoutils-patch/ndoutils1.4b9_light.patch
    patch –p1 –N < ndoutils1.4b9_light.patch
    ./configure –-prefix=/usr/local/nagios/ --enable-mysql –-disable-pgsql –-withndo2db-user=nagios –-with-ndo2db-group=nagios
    make
    cp ./src/ndomod-3x.o /usr/local/nagios/bin/ndomod.o
    cp ./src/ndo2db-3x /usr/local/nagios/bin/ndo2db
    cp ./config/ndo2db.cfg-sample /usr/local/nagios/etc/ndo2db.cfg
    cp ./config/ndomod.cfg-sample /usr/local/nagios/etc/ndomod.cfg
    chmod 774 /usr/local/nagios/bin/ndo*
    chown nagios:nagios /usr/local/nagios/bin/ndo*
  3. Add ndo2db daemon to the start up services:
    cp ./daemon-init /etc/init.d/ndo2db
    chmod +x /etc/init.d/ndo2db
    chkconfig –-add ndo2db


Installing Centreon

The Centreon install process is an interactive script, so it is fairly straightforward with only a few gotchas which I will note below.

  1. Start by download and extracting the stable version of Centreon:
    cd /usr/local/src
    wget http://download.centreon.com/index.php?id=169
    sudo tar –xzf centreon-2.3.4.tar.gz
    cd centreon-2.3.4
  2. Consolidate paths:
    sudo export PATH=”PATH:/usr/local/nagios/bin/”
  3. Now invoke the install script:
    sudo ./install.sh –i
  4. The script will now check all prerequisites, and then ask you to accept the license.
  5. Accept the license, and then walk through the install questions, answering yes (‘y’) to everything, and accepting the default paths.
  6. Eventually, you will reach a point where Centreon cannot find a path for RRDs.pm, or PEAR.php. Enter the following paths for each to continue the setup:
    • RRDs.pm:
      /usr/lib/perl5/vendor_perl/5.8.8/i386-linux-thread-multi/RRDs.pm
    • PEAR.php:
      /usr/share/pear/PEAR.php
      If prompted to update the PEAR modules, say yes.
  7. Finally, once the script has finished, restart the httpd (apache) service:
    /etc/init.d/httpd restart


Centreon Web Setup

  1. Before launching the web setup, make sure to initialize MySQL as the web setup will check for an initialized database as a prerequisite:
    sudo /etc/init.d/mysqld start
  2. Follow the prompts to initialize the database…
  3. Launch the web setup by entering the url in a browser:http://<servername_or_IP>/centreon
  4. Accept the defaults and let it verify all components…
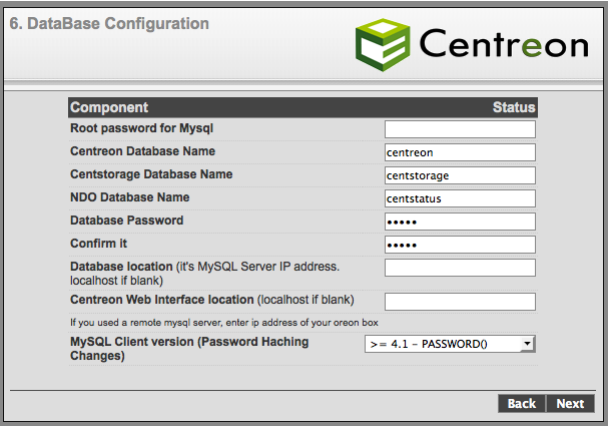
  5. Fill in the Database Configuration fields: (Use the default database names)
    cent_db_setup
  6. Continue through the rest of the setup… Do not enable LDAP. Make note of all your passwords.


Configuring SNMP

In order to allow Nagios to poll hosts using SNMP and to receive traps, the snmpd service must be configured on the Nagios server. This file is located at:

/etc/snmp/snmpd.conf

Edit the following section in the sample config file so it looks something like this:

# First, map the community name "public" into a "security name"
#
# sec.name source community
com2sec public default rocommunity
com2sec public 127.0.0.1 rocommunity
com2sec public 192.168.0.0/24 rocommunity
####
# Second, map the security name into a group name:
# groupName securityModel securityName
group notConfigGroup v1 public
group notConfigGroup v2c public
####
view systemview included .1 
####
# Finally, grant the group read-only access to the systemview view.
# group context sec.model sec.level prefix read write notif
access notConfigGroup "" any noauth exact systemview none none

Troubleshooting

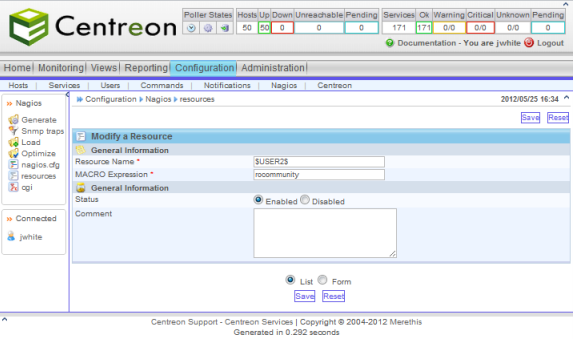
If Centreon is reporting errors when trying to poll a host via SNMP after initial setup, you may have to manually create the SNMP community variable. This can be found in the Centreon web interface:

Configuration > Nagios > Resources > New

cent_snmp_var


Processes & Services

The following services make up the essentials of this Centreon & Nagios implementation:

/etc/init.d/mysqld status
/etc/init.d/httpd status
/etc/init.d/ndo2db status
/etc/init.d/centstorage status
/etc/init.d/centcore status
/etc/init.d/nagios status
/etc/init.d/snmpd status
/etc/init.d/snmptrapd status

Check each of these services using the syntax above when troubleshooting issues with Nagios or Centreon. They should also be started in this order.


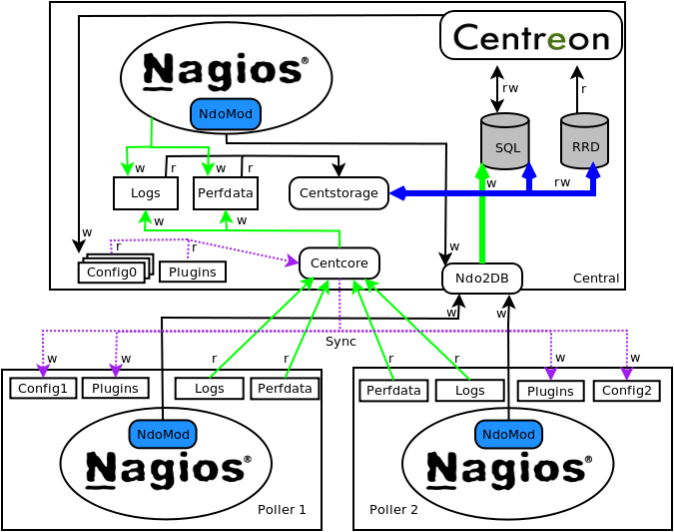
Centreon/Nagios Flowchart

Here is a diagram that helps explain how everything works together (found on the Centreon wiki):

cent_nag_flow


Conclusion

By following this guide, you will have a basic fresh instance of Nagios and Centreon ready to go and play with. There are many features to explore and things you can do with these tools, so look around the interface and try to explore as much as you can (The Centreon wiki and forums are a great place to start). In later posts, I will discuss how to do some more basic and advanced functions with the software.

Centreon: http://www.centreon.com/

Centreon Wiki: http://en.doc.centreon.com/Main_Page

Nagios: http://www.nagios.org/

Nagios Exchange: http://exchange.nagios.org/

└ Tags: Centreon, guide, IT, Linux, monitoring, Nagios, server, SNMP
4 Comments
Sep12

MS SQL Server Express 2008 Remote Connections

by John on September 12, 2012 at 8:59 PM
Posted In: Applications, IT, Windows

After installing a fresh instance of Microsoft SQL Server Express 2008, you may find that you are unable to make a remote connection from another machine. There are a number of items you should check to troubleshoot this:

Enable the TCP/IP Protocol for the Instance

  1. Open the “SQL Server Configuration Manager”
  2. Expand the settings for instance you are trying to connect to
  3. Select “Protocols”
  4. Right-click on the “TCP/IP” protocol and click enable

Start the MS SQL Browser Service

  1.  Go to Start -> Run -> Services.msc
  2. Right click on “SQL Server Browser” and go to properties (The service is likely disabled at this point)
  3. Change the “Startup type” to Automatic
  4. Click the “Start” button to start the service

Disable or Configure Windows Firewall

  1. Go to Start -> Control Panel -> Windows Firewall
  2. On the left, click the option to turn Windows Firewall on or off
  3. Turn the firewall off

OR

  1. Open Windows Firewall with Advanced Security
  2. Right-click on “Inbound Rules” on the left
  3. Select “New Rule”
  4. Select “Port” and click next
  5. Select “TCP” and enter port 1433 (or whatever port you have configured) and click next
  6. Select “Allow the connection” and click next
  7. Check Domain/Private/Public and click next
  8. Enter a name for the rule (ie. MSSQL) and click finish

Make sure Remote Connections are Enabled for the Instance

  1. Open up “SQL Server Management Studio Express”
  2. Connect to the server
  3. Right-click on the server and select properties
  4. Select “Connections”
  5. Ensure “Allow remote connections to this server” is enabled

Finally, after doing any or all of these steps, make sure you restart any SQL server services before trying to connect!

└ Tags: firewall, IT, MSSQL, Network, server, services, SQL, tips, Windows
 Comment 
Sep12

BareTail for Windows

by John on September 12, 2012 at 4:16 PM
Posted In: Applications, IT, Linux, Windows

Monitoring logs in Linux is a dream. The tail tool by itself, and especially piped into other tools, makes for an incredible log monitoring tool which if you work in Linux environments regularily, you get pretty reliant on. Unfortunately, the same cannot be said for monitoring text logs in Windows.

A colleague of mine introduced me to a program I had not heard of before today, BareTail, for Windows. It is essentially “tail -f” for Windows, only with many more options for filtering/searching, as well as tabbed log viewing.

You can download the application (a simple executable, no install) from Bare Metal Software’s site, here.

└ Tags: IT, logs, monitoring, tail, tools, Windows
 Comment 
  • Page 1 of 3
  • 1
  • 2
  • 3
  • »

Calendar

May 2025
M T W T F S S
 1234
567891011
12131415161718
19202122232425
262728293031  
« Dec    

Tags

2003 2008 R2 ACL AV Centreon conversion data loss deployment File firewall fix format guide hack hard drive image img iso IT life Linux logs malware monitoring MSSQL Nagios Network OS registry repair Security server services SNMP SQL Symantec tail tips tools unattend VirtualBox virus weekend Windows workaround

Links

  • AARCS
  • johndwhite.net
  • Project Mayhem Forums
  • RyanJ

PROMO CODE:
DRMHOST123
Green Web Hosting! This site hosted by DreamHost.

©2012-2022 John White | Powered by WordPress with Easel | Subscribe: RSS | Back to Top ↑