
Intro
Nagios is an incredible tool for monitoring your IT infrastructure. It offers monitoring and alerting for servers, switches, routers, firewalls, applications, services, and can be configured for just about any networkable device using SNMP. As powerful as it already is, a multitude of third party and official plugins, and client-side agents can be configured to increase efficiency and extend functionality. One of the biggest complaints I hear about Nagios is the complexity involved in configuring it. One of my challenges while I was deploying a Nagios monitoring system to a client was that the implementation needed to be maintained and expanded upon with relatively little Linux knowledge or in-depth understanding of Nagios itself, after I was gone.
The solution I came up with for this particular client was Centreon. Centreon is actually a full featured monitoring solution in itself, but uses Nagios as a back-end. This means that while configuration and monitoring is done from within the Centreon web UI, there is still a fully functional instance of Nagios running in the background that does all of the work you would expect. In this way, Centreon can be thought of as a very full-featured front-end interface, although it brings together a few other tools and custom functionality above and beyond a typical Nagios installation.
Anyway, in this post, I will detail the steps involved in getting Nagios & Centreon set up for monitoring your network. This guide is based on CentOS 5, but can easily be adapted to any Linux distribution.
Prerequisites
- By default, CentOs does not include all of the packages needed in the default yum repositories, so an additional repository must be added (RPM Forge):
mkdir /usr/local/src
cd /usr/local/src
wget http://packages.sw.be/rpmforge-release/rpmforge-0.5.1-1.e15.rf.i386.rpm
wget http://dag.wieers.com/rpm/packages/RPM-GPG-KEY.dag.txt
Edit RPM-GPG-KEY.dag.txt so the first line is
"-----BEGIN PGP PUBLIC KEY BLOCK-----"rpm -import RPM-GPG-KEY.dag.txt rpm -Uvh rpmforge-release-0.5.1-1.e15.rf.i386.rpm
Keep in mind, the version number reflects the version available when I did this. It will change over time, so you will have to find the available version if this doesn’t work for you.
- Now we should be ready to update the system and install our prerequisite packages using yum:
 yum update
 yum upgrade
 yum install httpd
 usermod –U apache
 yum install gd fontconfig-devel libjpeg-devel libpng-devel gd-devel perl-GD
 yum install openssl-devel perl-DBD-MySQL mysql-server mysql-devel
 yum install php php-mysql php-gd
 yum install php-ldap php-xml php-mbstring
 yum install perl-DBI perl-DBD-MySQL
 yum install perl-Config-IniFiles
 yum install rrdtool perl-rrdtool
 yum install perl-Crypt-DES perl-Digest-SHA1 perl-Digest-HMAC net-snmp-utils
 yum install perl-Socket6 perl-IO-Socket-INET6 net-snmp net-snmp-libs php-snmp
 dmidecode lm_sensors perl-Net-SNMP net-snmp-perl
 yum install fping cpp gcc gcc-c++ libstdc++ glib2-devel
 yum install php-pear
 pear channel-update pear.php.net
 pear upgrade-all
Installing Nagios
- Before installing Nagios, a user needs to be created and configured:
usradd -m nagios
usermod -L nagios
- A group for use of external commands also needs to be created:
groupadd nagcmd
usermod -G nagios,nagcmd nagios
- Add the apache user to the nagios and nagcmd groups:
usermod -G nagios,nagcmd apache
- The latest version of Nagios can be found at: http://www.nagios.org/download/ (Again, the version number may have changed since I wrote this). In this case I am downloading Nagios from sourceforge, extracting it, and configuring it with the users/groups above and some additional options:
cd /usr/local/src
wget http://prdownloads.sourceforge.net/sourceforge/nagios/nagios-3.2.3.tar.gz
tar –xzf nagios-3.2.3.tar.gz
cd nagios-3.2.3
./configure –-prefix=/usr/local/nagios –-with-command-group=nagcmd –-enablenanosleep –-enable-event-broker
make all
make install
make install-init
make install-commandmode
make install-config
Installing Nagios Plugins
The latest version of Nagios plugins can be found at: http://www.nagios.org/download/
- Make sure the plugin prerequisites are installed:
yum install fping
yum install openssl-devel
yum install openldap-devel
yum install postgresql-devel
yum install radiusclient-ng-devel
yum install samba-client libsmbclient
- Download and install the plugins:
cd /usr/local/src
wget http://ovh.dl.sourceforge.net/sourceforge/nagiosplug/nagios-plugins-1.4.15.tar.gz
tar –xzf nagios-plugins-1.4.15.tar.gz
cd nagios-plugins-1.4.15
./configure –-with-nagios-user=nagios –-with-nagios-group=nagios –-withopenssl=/usr/bin/openssl –-enable-perl-module
make
make install
Installing NDOUtils
NDOUtils is essentially a tool that allows Nagios to interact with a database, rather than use direct input/output. It is required because Centreon is database driven in that all of the configuration, history, and events are stored in a database.
- First, make sure the MySQL development package is installed:
yum install mysql-devel
- Now we can install NDOUtils. There are are multiple versions if NDOUtils available, but the one that should be used here is the official version, accompanied by a patch from Centreon:
cd /usr/local/src
wget http://prdownloads.sourceforge.net/sourceforge/nagios/ndoutils-1.4b9.tar.gz
tar –xzf ndoutils-1.4b9.tar.gz
cd ndoutils-1.4b9
wget http://svn.centreon.com/trunk/ndoutils-patch/ndoutils1.4b9_light.patch
patch –p1 –N < ndoutils1.4b9_light.patch
./configure –-prefix=/usr/local/nagios/ --enable-mysql –-disable-pgsql –-withndo2db-user=nagios –-with-ndo2db-group=nagios
make
cp ./src/ndomod-3x.o /usr/local/nagios/bin/ndomod.o
cp ./src/ndo2db-3x /usr/local/nagios/bin/ndo2db
cp ./config/ndo2db.cfg-sample /usr/local/nagios/etc/ndo2db.cfg
cp ./config/ndomod.cfg-sample /usr/local/nagios/etc/ndomod.cfg
chmod 774 /usr/local/nagios/bin/ndo*
chown nagios:nagios /usr/local/nagios/bin/ndo*
- Add ndo2db daemon to the start up services:
cp ./daemon-init /etc/init.d/ndo2db
chmod +x /etc/init.d/ndo2db
chkconfig –-add ndo2db
Installing Centreon
The Centreon install process is an interactive script, so it is fairly straightforward with only a few gotchas which I will note below.
- Start by download and extracting the stable version of Centreon:
cd /usr/local/src
wget http://download.centreon.com/index.php?id=169
sudo tar –xzf centreon-2.3.4.tar.gz
cd centreon-2.3.4
- Consolidate paths:
sudo export PATH=”PATH:/usr/local/nagios/bin/”
- Now invoke the install script:
sudo ./install.sh –i
- The script will now check all prerequisites, and then ask you to accept the license.
- Accept the license, and then walk through the install questions, answering yes (‘y’) to everything, and accepting the default paths.
- Eventually, you will reach a point where Centreon cannot find a path for RRDs.pm, or PEAR.php. Enter the following paths for each to continue the setup:
- RRDs.pm:
/usr/lib/perl5/vendor_perl/5.8.8/i386-linux-thread-multi/RRDs.pm - PEAR.php:
/usr/share/pear/PEAR.php
If prompted to update the PEAR modules, say yes.
- RRDs.pm:
- Finally, once the script has finished, restart the httpd (apache) service:
/etc/init.d/httpd restart
Centreon Web Setup
- Before launching the web setup, make sure to initialize MySQL as the web setup will check for an initialized database as a prerequisite:
sudo /etc/init.d/mysqld start
- Follow the prompts to initialize the database…
- Launch the web setup by entering the url in a browser:
http://<servername_or_IP>/centreon - Accept the defaults and let it verify all components…
- Fill in the Database Configuration fields: (Use the default database names)
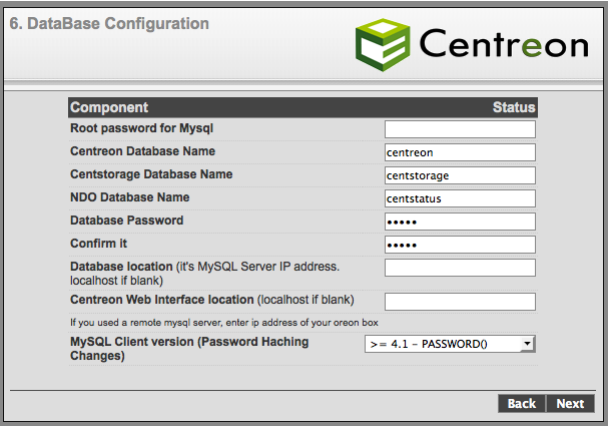
- Continue through the rest of the setup… Do not enable LDAP. Make note of all your passwords.
Configuring SNMP
In order to allow Nagios to poll hosts using SNMP and to receive traps, the snmpd service must be configured on the Nagios server. This file is located at:
/etc/snmp/snmpd.conf
Edit the following section in the sample config file so it looks something like this:
# First, map the community name "public" into a "security name"
#
# sec.name source community
com2sec public default rocommunity
com2sec public 127.0.0.1 rocommunity
com2sec public 192.168.0.0/24 rocommunity
####
# Second, map the security name into a group name:
# groupName securityModel securityName
group notConfigGroup v1 public
group notConfigGroup v2c public
####
view systemview included .1
####
# Finally, grant the group read-only access to the systemview view.
# group context sec.model sec.level prefix read write notif
access notConfigGroup "" any noauth exact systemview none none
Troubleshooting
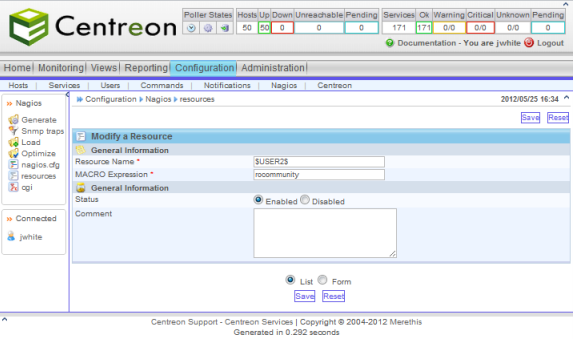
If Centreon is reporting errors when trying to poll a host via SNMP after initial setup, you may have to manually create the SNMP community variable. This can be found in the Centreon web interface:
Configuration > Nagios > Resources > New
Processes & Services
The following services make up the essentials of this Centreon & Nagios implementation:
/etc/init.d/mysqld status
/etc/init.d/httpd status
/etc/init.d/ndo2db status
/etc/init.d/centstorage status
/etc/init.d/centcore status
/etc/init.d/nagios status
/etc/init.d/snmpd status
/etc/init.d/snmptrapd status
Check each of these services using the syntax above when troubleshooting issues with Nagios or Centreon. They should also be started in this order.
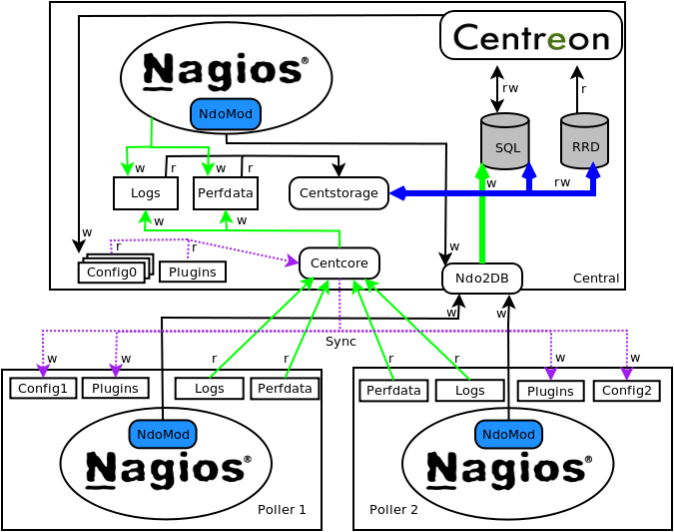
Centreon/Nagios Flowchart
Here is a diagram that helps explain how everything works together (found on the Centreon wiki):
Conclusion
By following this guide, you will have a basic fresh instance of Nagios and Centreon ready to go and play with. There are many features to explore and things you can do with these tools, so look around the interface and try to explore as much as you can (The Centreon wiki and forums are a great place to start). In later posts, I will discuss how to do some more basic and advanced functions with the software.
Centreon: http://www.centreon.com/
Centreon Wiki: http://en.doc.centreon.com/Main_Page
Nagios: http://www.nagios.org/
Nagios Exchange: http://exchange.nagios.org/

This is some righteous shit right here. Great.
Thanks for the info!
Terrific page, Carry on the good work. Appreciate it!
Thanks for the motive of giving this manner of wonderful details.